I arrived at end October before the France Covid Lockdown came into effect and had fortunately preorder with Gedimat to deliver materials needed during w/c 2nd November. They delivered without an issue on Monday 2nd and this allowed me to commence work without delay.
I had prepared the following Work Tasks to convert the Loft into a usable space:
·
Remove
Old Floor Insulation
·
Clean
Floor
·
Wood
Treatment on Floor and Roof
·
Create
Loft Floor Door Frame
·
Build
Loft Door and Insulate
·
Run
Electric Cables for Wall Sockets
·
Run
Electric Cables for Roof Downlighters
·
Line
Perimeter Back + Front Walls 14x0.6m Insulated PB
·
Line
Side East * West Apex Walls Insulated PB 21sqm
·
Plasterboard
Stairs Wall West Side
·
NorthEast
Corner Store Rooms Stud Frame
·
Plasterboard
+ Insulate NE Corner Store Room
·
Fix
2xDoors & Frames 800x2000
·
Insulate
Roof 21sqm
·
Plasterboard
Roof 21sqm
·
Render
both Chimney Breasts
·
Floor
Sanding and Staining
·
Spray
Paint Plasterboard
·
Install
Light Switches
·
Install
Downlights
·
Install
Power Sockets
·
Fit
Skirting Board
WeekEnding 8th November
Here are some snaps of the work progress during the week:
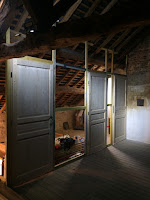
I had already ordered the doors and frames from Lapeyre and as before created the partition framing around the three doors that will allow the loft to be accessed from tbe stairs and create a Store Room, as well and as a Utilities Room for the electric fuse panel, bathroom water heater and Sun Tunnel.
The doors are square and opened without adjustment, so once the ceiling is completed the framing to plasterboard will be added.
I had a lot of Tyvek House Wrap left from previous work and to avoid the insulation touching the roof tiles and to create a 25-30mm air flow space and vapour barrier, I used the wrap across the vertical roof beams
Weekending 15th November 2020
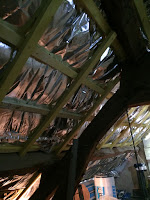
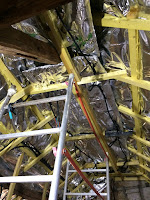
Having completed the fixing of the Tyvek, spent the week securing the SuperFoil40 insulation across the sloping roof and securing with horizontal Chevrons to the main vertical beams and then additional vertical Chevrons that would provide the support for plasterboard and additional vapor gaps.
The SuperFoil has 37 layers of foil and insulation to protect against the cold and heat. it was easy to install, but needed sharp scissors and a knife to cut and then sealed with foil tape and stapled on the edge to keep in place until the chevrons are applied.
Weekending 22nd November 2020
Having completed the fixing of the Tyvek, spent the week securing the SuperFoil40 insulation across the sloping roof and securing with horizontal Chevrons to the main vertical beams and then additional vertical Chevrons that would provide the support for plasterboard and additional vapor gap.
I also create a structure for a central ceiling for downlighters than would allow the A-Frame Structure to be exposed and for extra ceiling insulation supported. Additionally, I cut 10 Insulation boards in half and 30 plasterboards to be able to lift them up into Bedroom 3 in advance of finally lifting them into the loft!
In advance of plasterboarding, I installed the sheathed electric cable runs for lighting, radiators and sockets. Despite initially forgetting, I installed the light switch cables eventually as well!
Weekending 29th November and 6th December
Having completed the insulation and support structure the next two weeks involved securing Insulation Board to the stone walls on both chimney said Apex Walls and the low front and back walls. Then securing plasterboard to the both front and back roofs and the flat ceiling.


