Wednesday, 19 September 2018

July to mid August 2018 Work Completed


Stone Pile
Small Pile of Stone that will quadruple
Having removed the base of the old outside loo, the work generated a useful pile of stone that has been saved and will be useful for future projects.

In fact, I have already decided to use some on the West Side of the rear for a low wall to retain some of the soil to be removed and create a shrub bed.

I will also use some to create a low stone wall on the East Side of the new Garden Room overlooking the garden and making a courtyard at the back.


Exposed Wall
Initially, I thought it an unnecessary task but Nick my architect persuaded me to remove the side Barn Wall and Rear wall concrete render as shown opposite.

I was concerned having tried to remove some of this compound type of concrete on the internal kitchen wall.


As seen opposite, I removed all the concrete render and it was easier than expected using my jack hammer, but I suspect it was because it was onto the stone wall and not a cement render wall as well, as in the kitchen.

Nevertheless, yet again having the right tools even cheap ones can make the task so much easier.
 Floor Foundation Creation


I marked out the new Garden Room using pegs, a laser and checking the corner with a 3, 4 and 5 metre measure test I saw on the internet.


Fosse Waste Pipe Install and Connection.
An access hole was created in the rear wall to enable both the downstairs Loo and Bathroom waste and water to flow to the Fosse and I dug the trench to the Fosse, laid pipe and connected to the fosse inlet and covered with gravel to protect the pipe.


 Kitchen Utility Water Waste
Ta trench was then created for the downstairs water waste from kitchen and utility room was installed and connected to the internal water waste pipe installed.


Footings and Foundation
Having marked out where the footings would run i then dug down to 800mm below Ground Level to prepare the footings and shuttered the sides.


Tuesday, 12 June 2018

Outside Loo Floor base gone!

It proved hard work, but 2 days effort has resulted in the old Outside Loo Floor being removed and neaely  a cubic metre of stone and concrete being taken out.
My Parkside pneumatic hammer came im really handy. As with most things experience and the right tools make the job easier, but nevertheless it was hard work and tiring.  
You will see a pile of granite stone which is about 1/2 of that excavated, as the rest has been taken to the front of the house to continue the renovation of the old dry stone wall, that hopefully Jacques  will continue!


So now onto removing the passage floor that I suspect is mostly concrete.  This will allow the preparation of the the new Garden Room Floor, once of course the external walls foundation is completed.

Thursday, 7 June 2018

New Windows and Doors

Renovation work on the house opposite our Grange is progressing well and I had the new Windows and Front Door installed today and all looking good. Now I need to strips, paint and rehang the shutters this summer after other tasks on my schedule are done!


Tuesday, 5 June 2018

Garden Room Plans

On 1st June 2018 we submitted a Delclaration Prealable to provide an outline of the plans for the Garden Room to form a key part of the renovation of La Maison Grise-No8 and added to the existing extension previously used as the Boiler Room and planned to be converted to a Utility Room at the back of the house, as shown.

As the new extension will be below 20sqm there is no approval required, but the Marie needs to be informed to avoid issues.

Here below are some of the key plans as a part of the submission.


If all goes well, I plan to do the foundations and sub floor during this summer  and then the Window Framing and Roof .

Sunday, 27 May 2018

Renovation Progress May 2018


I returned to Colondannes for 10 days in early May 2018 and continued to make good progress, ahead of another planned visit during early June, when the new Windows are due to be installed.  The following were the tasks completed:

  • Plot Dimensions – In advance of submitting the Declaration Prelalble to the Marie covering the new Garden Room, the Architect requested I confirm the dimensions as below:


  • Garden Room Lowest Height - In anticipation of the Garden Room construction I needed to confirm the lowest level of the current Utility Room, which in 2450mm from the current ground level and 3200 to the highest cross beam near the rear wall.  This confirms sufficient head room and that with a low 400mm wall it will allow rear windows of about 1500mm height.

  • Garden Room Internals – Measurements suggests a Depth of 2800 and width of 4150.  This will allow 6 rear Glazed Panels of 1500x500, with vertical support of 100mm and supports of 200mm. with the Barn Wall or 1000mm forming a part of the east side the will be space for a Glazed Panel of 500mm and Door of 800mm


  • Peg Out Garden Room – As a part of this exercise I dug down to the Fosse and confirmed that the Water/Toilet Waste Inlet was outside the Foundations Line, but the Concrete Shoulder of the Fosse would run under the line. Further investigate and a visit from Frappat confirmed that it would be possible to create Lintel Bridge and run the Toilet Waste under the Floor to this inlet.
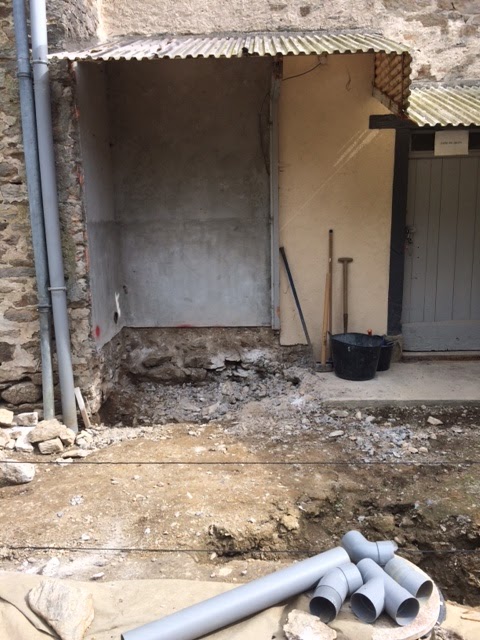
  • Remove Outside Loo Wall & Floor – The wall removal was very straight forward, but the Concrete Floor is another matter and challenge.  I have determined that a Hydraulic Hammer needs to be hired to take on this heavy duty task during my June visit.
This needs to be completed to allow a 100mm hole in the back wall into the new downstairs loo for the Toilet Waste

  • Partition Wood Spray – Having completed all the partition structures I sprayed all the door and wooden frames to protect everything, in addition to the ceiling beams that were treated last year.
  • Kitchen Utility Room Door Opening – As planned, Martin Sprague came to create the opening for a door through the 500mm rear wall and install the 3 Pre-stressed Lintels.  We removed an unbelievable amount of stone and a little rubble.  Martin made good the wall and I installed the new door. The stone removed was used to repair the external driveway wall that my neighbour Jacque did within 3 days of being told the stone was available.  Great Result!

  •  Hang New Doors to Bedroom 3 and Loft – Having added to the door frames to enlarge for the new thicker doors, I hung both and adjusted the Bed3 door to fit and still need to finish the adjustment to the Loft Door and the frame that is slightly larger than the door width.


  • Planned Tasks for June Visit
I.        Remove Utility Window
II.       Fill Landing Window Edge
III.      Check Fosse Vent Pipe
IV.      Dig Out Guttering Drain
V.       Remove Outside Loo Floor
VI.      Adams Fitting New Windows
VII.     Stairs-Loft Partitioning with Plasterboard
VIII.    Channel Walls for Electrics
IX.      Drill Pipe and Cable HOLES in Partition
X.       Adjust Loft Door
XI.      Kitchen Waste Water Pipe HOLE-100mm
XII.     Toilet Waste HOLE- 40mm