So, work has been going well this year and the completion if the 1st Fix Electrics and Plumbing now allows me to completed the ceiling levelling, Insulation and Plasterboaring of the ceilings and new stud wall. The plan to to do so by end August and then be ready for total plastering in October.
Week Ending 30th June 2019
Ceiling Levelling
Having already completed the ceiling levels of the Cuisine, Utility and Salon du Jardin I started work on the Salon and Downstairs Loo.
It went easy than planned, once I used a 4m straight edge to get the right levels in the centre and was able to complete the loo ahead of schedule.
Had to move some of the cables the guys had laid, but all good and the ceiling will be the height as the old one I removed.
I suspect it will make he laying of the insulation a bit tricky, but levelling across the old beams was easier.


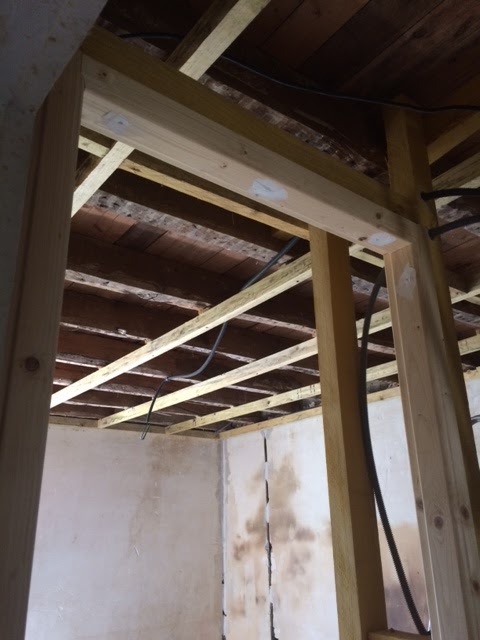 The rest of the week saw the Ceiling Levelling of Bedroom 3 and 1, both of which progressed well, despite the intense temperatures. I realised the easiest way was to first do a soft install of the perimeter beams at each end and install the cross beams at each end and then use the straight end to level across the beam at 1/3 then middle and then the other 1/3 and it made the task easier.
So I am no ahead of schedule and will complete the smaller Bed 2 on Monday, hopefully before the delivery of 90 Plaster boards arrives and need moving not each room!


 Kitchen Room
I then proceeded to insulated the Kitchen and this proved more difficult, partly due to the ceiling level beams that crossed the main beams to be insulated. HOWEVER, the more complex aspect is that the Naturoll Insulation is 595mm wide and needs to be cut to reduce the width to 300-400mm to fit the old beams. This was time consuming and quite and effort, made easier by the use of a pair of long handled grass shears.
I soon got into the swing of doing it and a rhythm that made it easier, although it would have been great to have had another pair of hands to help with the task.
Salon Room Nevertheless, things went well and by Friday I had completed the Salon and little downstairs Loo, so now just all upstairs to do early next week.

Pleasingly, I am 2 days ahead of my rough work schedule and it is so nice not to be under any pressure.
Week Ending 14th July 2019
Bedrooms
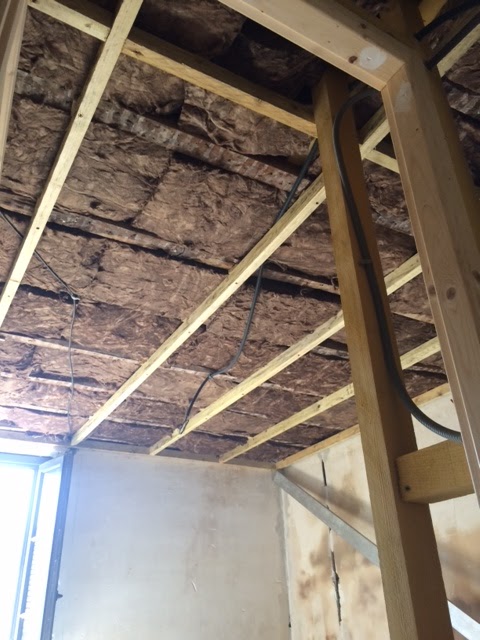
Well, all of the ceiling insulation is now complete and I managed to do the bedroom ceiling yesterday and the bathroom today, as shown below. As with many tasks it gets easier the more you do and learn from repetition.


Bathroom and Landing
As planned I completed the final rooms and had time to spare, so moved 15 panels of Plaster Board into the Kitchen in readiness for fixing the Garden Room and Utility. It was heavy work moving the boards, but the Drywall Panel Carrier was a huge help.


I also tested the ceiling lift I bought to help position and hold full boards to screw into the joist and it seems to be a big help. I will post a pic when I have mastered the task!
Weekending 21st July 2019
Plastic Water Waste Test Before starting any plaster boarding I carried out a water test of the internal plastic waste water pipes from the Kitchen, Downstairs Loo and Bathroom. Having used the joint sealant glue for the first time, I was pleased that running water through each section of pipe intake proved successful and no water leaks appeared after more than at least 5 minutes of jetting water into each inlet. As there water restrictions and a hose ban in Creuse, I used my portable pump and the water from the inactive Fosse Septic for the test. So, hopefully no issues will be hidden behind the plaster board now!
Ceiling Plaster Boarding - Garden Room
I started the work by first moving 16 boards from the barn into the kitchen and it was heavy work, made easier by the Lifter I purchased, but still difficult for one person, not used to this work!
I made a Tee Bar Rest and had six extendable support pole that made the task easier to rest the boards whilst moving into position and they were invaluable, but is was still heavy work getting the boards up to 2.7m high. Nevertheless, I slowly succeeded and completed the ceiling by midday Friday, so continued to a line the window surround and did is within the 2 days allotted.
it was pleasing to see the room starting to take finished shape, so next week I will do the ceilings downstairs.


Ceiling Plaster Boarding - Kitchen
I completed the work in the Kitchen without too many problems, but hard work lifting the boards on my own. The T-bar support I made held one end in place against the wall, whilst I raised the full board using Extendable Leg Supports that where a great help.
It got easier as work and familiarity progressed, but was hard work and I managed to remember to cut the down-light holes.
It was pleasing to see that my levelling seems to be OK and produces a good end result.
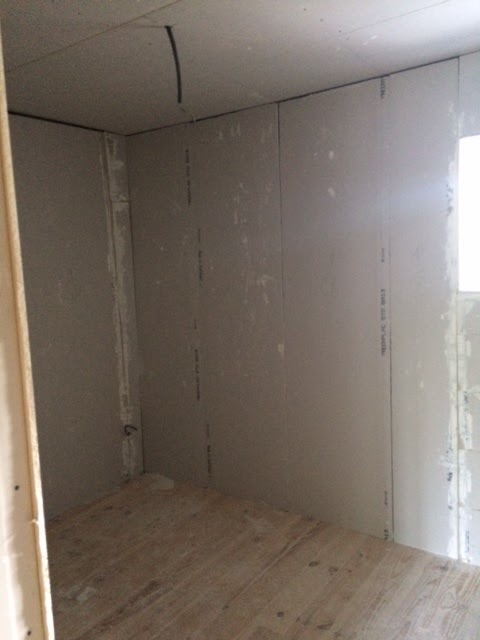
Ceiling Plaster Boarding - Salon
The week has ended with the completion of the Salon and Loo Ceiling, as well as the end wall, that now makes the room look bigger and things as starting to take shape!


Weekending 28th July 2019
Kitchen Wall Insulation and Plaster boarding

 The week started well, despite the extreme temperature outside, it was cooler in the house but noticeably warmer! As shown here, the services wall insulation went in quickly and over the electrics and around the water pipes. The full plaster boards went up well, with minimal cutting and immediately the room started to take on a new look and feel.
This time I remembered to expose all the connections! and ensured they were in the correct positions, helped by the good work by the ALS-Frappat guys and their labels on the ends of the electrical cables.


Utility, Loo and Cloak Cupboard Plaster boarding
Well the week end well, despite the extreme temperatures. I insulated the partition walls in the Utility Room and plaster boarded the walls and the under stairs coat cupboard, which was a bit of a fiddle. The big walls are easier than these smaller ones, where more cutting is needed.
As a result of the heat I only cut to size the Insulation Board for the west wall in the utility, the adhesive board mix would have gone off too quickly, but the 50mm board was good to work with and I worked out next week, I can cut it in half length ways to get upstairs and then use on the west wall horizontally.


Weekending 4th August 2019
Upstairs Ceilings and Room Dividers
Good progress made this week upstairs, as it was slightly cooler in the mid 20's and it has turned out that the puzzle of how to get the plaster boards upstairs has been resolved with a good solution. I had toyed with lift the boards through the windows, using the scaffold tower, but in the end I simply cut the boards on the length to make each 1.2m wide boards 600mm and could then just lift them up and around the stairs! It helped when I cut them to length downstairs and then proceeded to down each bedroom ceiling and the new Wall Divider Partition for Bedroom 1 and 2 as shown.
In fact, I wish I had cut all the Ceiling Boards downstairs in this way, as it would have made it much easier than a novice trying to lift and fix full board!
So now next week I will complete the Bathroom/Landing Walls and start applying the Insulated Plasterboard to the west side walls in Bed1 and 2, as well as the Utility Room and finish the Garden Room East Side wall.
Weekending 11th August 2019
Well started well and a bit cooler, so easier to work in. On Monday I completed the Upstairs Landing Plasterboard on the Ceiling, and Bathroom Wall, as well as insulated. Also cut the ceiling hole for the Sun Tunnel covering. I was pleased to discover that the middle downlighter hole was on the edge and now allows me to use the cable and install the Velux Light Fitting in the Sun Tunnel. Good Result! Just need to make a slight adjustment to fit the cover now.


So now to finish the East Garden Room Wall and then onto cutting all the West External Walls with Insulated Plaster board, ready for mixing the cement adhesive for fix on Friday, if it is not too hot!
 Work on the East Side Garden Room Wall went well today and I was completed early afternoon, so took some time off! A few fiddly bits but all went well and I can now plan to fully render the alcove wall and using the support beam wood left over, put up a few shelves. I guess this will not be until the October visit.
I have left the electric cables showing for the plugs and the underfloor heating control in the corner and installed trunking with a pull through for the heat sensor that will need to be installed.
Well, today (Thursday 8th) was another hot one and I had mixed a 1/4 bag of the Mortier Adhesif to test out the Insulated Plaster board so did little test under the small window in Bedroom 2 and it worked well, so finished the mix applying the Plasterboard around the window, which work well. The pic I took was too dark so will record it later. I decided to fix the fibre board to the Internal Shower Walls and managed to do so using all the 3mm for the side walls and 80mm for the back wall. The special screw disks work well and I now understand how they work. I have left the middle section, where the shower taps are, unsecured and will now be able to work out how to connect to the P.E.R piping at the back and get the fixings right for the Shower Taps.
Weekending 18th August 2019
Dot and Dab insulation and PlasterBoarding
With a busy week ahead of visitors, I suspect there may not be time to complete much work so made an early start on Monday and succeeded in getting the smaller back Bedroom 2 done and complete. Then completed the Insulation Boarding of Bed 2, as well
Cutting all the boards in advance is definitely the way to go, as the Cement Adhesif will go off too quickly.


So I will now start all the Plasterboard cutting in advance for each 1/2 bag of the Adhesif, which will be enough to do at least 3-4 full boards and before the mix goes off.
Weekending 25th August 2019
Dot and Dab insulation and PlasterBoarding
This week saw me completing all the main boarding, but I have run out of full plasterboard and have had to resort to using of off cuts. It has been useful to retain these in good order and of course will result the wastage. I tried to order more full boards from my local Gedimat, but the contact must be on holiday, but it has worked out fine.
I used some of the Insulation Boards to box in the Window Alcoves and these worked out great and provide double insulation and are strong. It also made is easier to support the new air vent pipes for the wood stoves.
I have fixed most of the boards, but as the week progressed and temperatures once again exceeded 30 degrees on Friday I completed all the small cutting and have them all ready to fix when the temperature falls after the weekend, next week.


Weekending 1st September 2019
Tidy Up Tasks
On Monday I completed all the main boarding task, and having run out of full plasterboard I managed to utilise the off-cuts and thereby reduce the waste. So the week I will be undertaking a list of tidy and clean up tasks and clearing up to leave the rooms ready for Russell to start the plastering on 9th September.
The key tasks are to use a new piece of thick oak to create a surround on the Salon Chimney breast and secure this to the wall and bracket and start the rendering of Garden Room Walls.
So, I am well on the way to completing the tasks for the week and in addition to cutting more small element of plasterboard, I have:
 And finally, I applied the Aqua Pro Seal to the Shower Fibre Board and Scrim, and whilst tacky applied the Elements Waterproof Scrim and another sealant coat as shown here.
Work continued to progress well and I completed the Tile Boarding of the Bath surround , but out the front in the loft for safe keeping and to allow full access for the plastering. I will seal this once the plastering is complete.
 I also boarded the Gallows Bracket below the chimney, ahead of me apply the render next week and it masks the bracket and will look better once all is rendered and the wood Stove is installed.
Weekending 8th September 2019
Plastering Prep Tasks
So, this week is preparing for the plastering next week and I am doing the final small boarding bits and plan to do my wall rendering before the end of this week. I have used expanded foam to fill some of the holes and this is both easy to apply and cut afterwards. I also used soem to fix one of the steps of the stairs and produced a very good result. I have ordered the Oak Cil for the Garden Room for a local wood yard and should get a call to collect this week.

 I have start to fix the Salon Chimney Mantel, which is a tricky task but progress was made as shown here and I will hopefully achieve the desired result.

I have assembled, pegged and glued the Mantel to test the fit of the unit before finalising matters and found that it is about 1-2mm too small and tight to go around the chimney. However, after a small reduction in the left and right hand side, it should be fine and I think I have a way to plane the side down a little and plan to attempt this next week whilst the walls are being plastered.

 Had a good morning applying the first render coat to the Chimney and Garden Room Alcove, before plastering starts and again the Enduit 65 Mix was great to work with, providing you get the water/powder ratio right.
Will start the work to Point the rear Garden Room stone wall tomorrow, but might need to get a pointing trowel before I commence.
Weekending 15th September 2019
Plastering
As hoped R.Kenwood Plastering arrived early on Monday and I was immediately impressed with their organised unload from the van into the house. Everything was prepared and a place for everything. Russell and Stevie have clearly worked together loads and it was an organised and professional machine jumping into action. The upstairs ceilings and walls had scrim and beading applied and readied for the plaster.
Tuesday and Wednesday were spent applying both the first and second coat and then preparing the downstairs in the same organised way. There were some issues with coats drying quickly, buy the end result was SILKY SMOOTH, and my french electricians and plumbers visited and kept touching the finished wall in disbelieving way; they were impressed to say the least.
I am simply delighted and excited at seeing the full complete result at the end of the week, but already it is obvious this is a high quality team who create an exceptional quality end results.
Here are some snaps of finished walls partly dried.


Well, its Friday and the final work day this summers visit. Temperature has reached well over 30 outside, but it is thankfully cooler inside the Maison, so final plastering of the Utility and Cuisine can proceed and it is looking great. I will publish photos when tomorrow when the rooms have had a chance to dry out. What I can say is how impressed I am at the fantastic finish quality. I am so pleased I discovered Russell, as I could never have achieved a good result just dry lining the plasterboard joins and edges. The use of real professionals like Russ and Stevie is totally justified and it is so good to find skilled, reliable guys who take such pride in the work and end result.
I am a truly satisfied chap today and will return to the UK on Sunday looking forward to my return in October to give the whole inside a few watery white emulsion sprays, before Linda decides the colour scheme for each room.
Here is a video of the final fully plastered rooms, drying out:
Week Ending 7th July 2019
Ceiling Levelling
So the week started well and I completed the ceiling levelling of Bedroom 2 On Monday, and the Bathroom as well as Landing on Tuesday. I expected these to be more complex than they turned out to be as finding the level was easier. As planned, the plaster board delivery arrived and fortunately I covered the double stacked pallets before a huge thunderstorm arrived.
Waste Water Pipe Sealing
I had delayed this task until all the electrics and water feed pipe were installed and I had finished the ceiling levelling. So before fitting the insulation I finally marked up all the pipes I had loose fitted and used the plastic pipe glue to seal each joint. I need to fathom how to water test all the pipes before doing the plaster boarding and suspect I am going to have to buy some spare end caps first!
Ceiling Insulation
I started installing the 145mm thick Knauf Natural 032 Insulation into the ceiling void I had created in the Garden Room and Utility, which went well, as I could roll the 595mm wide across the ceiling support structure create and it took a morning to complete, well ahead schedule.
Garden and Utility Rooms
Garden and Utility Rooms


I then proceeded to insulated the Kitchen and this proved more difficult, partly due to the ceiling level beams that crossed the main beams to be insulated. HOWEVER, the more complex aspect is that the Naturoll Insulation is 595mm wide and needs to be cut to reduce the width to 300-400mm to fit the old beams. This was time consuming and quite and effort, made easier by the use of a pair of long handled grass shears.
I soon got into the swing of doing it and a rhythm that made it easier, although it would have been great to have had another pair of hands to help with the task.
Salon Room Nevertheless, things went well and by Friday I had completed the Salon and little downstairs Loo, so now just all upstairs to do early next week.


Pleasingly, I am 2 days ahead of my rough work schedule and it is so nice not to be under any pressure.
Week Ending 14th July 2019
Bedrooms
Well, all of the ceiling insulation is now complete and I managed to do the bedroom ceiling yesterday and the bathroom today, as shown below. As with many tasks it gets easier the more you do and learn from repetition.


Bathroom and Landing
As planned I completed the final rooms and had time to spare, so moved 15 panels of Plaster Board into the Kitchen in readiness for fixing the Garden Room and Utility. It was heavy work moving the boards, but the Drywall Panel Carrier was a huge help.


I also tested the ceiling lift I bought to help position and hold full boards to screw into the joist and it seems to be a big help. I will post a pic when I have mastered the task!
Weekending 21st July 2019
Plastic Water Waste Test Before starting any plaster boarding I carried out a water test of the internal plastic waste water pipes from the Kitchen, Downstairs Loo and Bathroom. Having used the joint sealant glue for the first time, I was pleased that running water through each section of pipe intake proved successful and no water leaks appeared after more than at least 5 minutes of jetting water into each inlet. As there water restrictions and a hose ban in Creuse, I used my portable pump and the water from the inactive Fosse Septic for the test. So, hopefully no issues will be hidden behind the plaster board now!
Ceiling Plaster Boarding - Garden Room
I started the work by first moving 16 boards from the barn into the kitchen and it was heavy work, made easier by the Lifter I purchased, but still difficult for one person, not used to this work!
I made a Tee Bar Rest and had six extendable support pole that made the task easier to rest the boards whilst moving into position and they were invaluable, but is was still heavy work getting the boards up to 2.7m high. Nevertheless, I slowly succeeded and completed the ceiling by midday Friday, so continued to a line the window surround and did is within the 2 days allotted.
it was pleasing to see the room starting to take finished shape, so next week I will do the ceilings downstairs.


Ceiling Plaster Boarding - Kitchen
I completed the work in the Kitchen without too many problems, but hard work lifting the boards on my own. The T-bar support I made held one end in place against the wall, whilst I raised the full board using Extendable Leg Supports that where a great help.
It got easier as work and familiarity progressed, but was hard work and I managed to remember to cut the down-light holes.
It was pleasing to see that my levelling seems to be OK and produces a good end result.
Ceiling Plaster Boarding - Salon
The week has ended with the completion of the Salon and Loo Ceiling, as well as the end wall, that now makes the room look bigger and things as starting to take shape!


Weekending 28th July 2019
Kitchen Wall Insulation and Plaster boarding

 The week started well, despite the extreme temperature outside, it was cooler in the house but noticeably warmer! As shown here, the services wall insulation went in quickly and over the electrics and around the water pipes. The full plaster boards went up well, with minimal cutting and immediately the room started to take on a new look and feel.
This time I remembered to expose all the connections! and ensured they were in the correct positions, helped by the good work by the ALS-Frappat guys and their labels on the ends of the electrical cables.


Utility, Loo and Cloak Cupboard Plaster boarding
Well the week end well, despite the extreme temperatures. I insulated the partition walls in the Utility Room and plaster boarded the walls and the under stairs coat cupboard, which was a bit of a fiddle. The big walls are easier than these smaller ones, where more cutting is needed.
As a result of the heat I only cut to size the Insulation Board for the west wall in the utility, the adhesive board mix would have gone off too quickly, but the 50mm board was good to work with and I worked out next week, I can cut it in half length ways to get upstairs and then use on the west wall horizontally.


Weekending 4th August 2019
Upstairs Ceilings and Room Dividers
Good progress made this week upstairs, as it was slightly cooler in the mid 20's and it has turned out that the puzzle of how to get the plaster boards upstairs has been resolved with a good solution. I had toyed with lift the boards through the windows, using the scaffold tower, but in the end I simply cut the boards on the length to make each 1.2m wide boards 600mm and could then just lift them up and around the stairs! It helped when I cut them to length downstairs and then proceeded to down each bedroom ceiling and the new Wall Divider Partition for Bedroom 1 and 2 as shown.
In fact, I wish I had cut all the Ceiling Boards downstairs in this way, as it would have made it much easier than a novice trying to lift and fix full board!
 |
| Bed2 Wardrobe Frame |
 |
| Bed1+2 entrance |
 |
| Bed1 Wardrobe Frame |
 |
| Bath Wall Frame |
 |
| Bathroom from Bed3 |
 |
| Bathroom Ceiling |
Weekending 11th August 2019
Well started well and a bit cooler, so easier to work in. On Monday I completed the Upstairs Landing Plasterboard on the Ceiling, and Bathroom Wall, as well as insulated. Also cut the ceiling hole for the Sun Tunnel covering. I was pleased to discover that the middle downlighter hole was on the edge and now allows me to use the cable and install the Velux Light Fitting in the Sun Tunnel. Good Result! Just need to make a slight adjustment to fit the cover now.


So now to finish the East Garden Room Wall and then onto cutting all the West External Walls with Insulated Plaster board, ready for mixing the cement adhesive for fix on Friday, if it is not too hot!
 Work on the East Side Garden Room Wall went well today and I was completed early afternoon, so took some time off! A few fiddly bits but all went well and I can now plan to fully render the alcove wall and using the support beam wood left over, put up a few shelves. I guess this will not be until the October visit.
I have left the electric cables showing for the plugs and the underfloor heating control in the corner and installed trunking with a pull through for the heat sensor that will need to be installed.
 |
| Shower Walls |
Weekending 18th August 2019
Dot and Dab insulation and PlasterBoarding
With a busy week ahead of visitors, I suspect there may not be time to complete much work so made an early start on Monday and succeeded in getting the smaller back Bedroom 2 done and complete. Then completed the Insulation Boarding of Bed 2, as well
Cutting all the boards in advance is definitely the way to go, as the Cement Adhesif will go off too quickly.


So I will now start all the Plasterboard cutting in advance for each 1/2 bag of the Adhesif, which will be enough to do at least 3-4 full boards and before the mix goes off.
Weekending 25th August 2019
Dot and Dab insulation and PlasterBoarding
This week saw me completing all the main boarding, but I have run out of full plasterboard and have had to resort to using of off cuts. It has been useful to retain these in good order and of course will result the wastage. I tried to order more full boards from my local Gedimat, but the contact must be on holiday, but it has worked out fine.
I used some of the Insulation Boards to box in the Window Alcoves and these worked out great and provide double insulation and are strong. It also made is easier to support the new air vent pipes for the wood stoves.
I have fixed most of the boards, but as the week progressed and temperatures once again exceeded 30 degrees on Friday I completed all the small cutting and have them all ready to fix when the temperature falls after the weekend, next week.


Weekending 1st September 2019
Tidy Up Tasks
On Monday I completed all the main boarding task, and having run out of full plasterboard I managed to utilise the off-cuts and thereby reduce the waste. So the week I will be undertaking a list of tidy and clean up tasks and clearing up to leave the rooms ready for Russell to start the plastering on 9th September.
The key tasks are to use a new piece of thick oak to create a surround on the Salon Chimney breast and secure this to the wall and bracket and start the rendering of Garden Room Walls.
So, I am well on the way to completing the tasks for the week and in addition to cutting more small element of plasterboard, I have:
- Successfully cut the Oak to be use to hide the support bracket top.
- Drilled the wall ether the Chimney, and a hole in the front of the bracket to provide support for the Oak Surround, to be fitted after plastering in complete.
- Fix plasterboard to the Garden Room Window Cill, which will eventually have an Oak Cill on top.
- Adjusted the pipework for the Salle de Bain Basin and Bath.
- Started to clear items out of the house, including all of the doors, to give Russell and clear work place for the plastering.

 And finally, I applied the Aqua Pro Seal to the Shower Fibre Board and Scrim, and whilst tacky applied the Elements Waterproof Scrim and another sealant coat as shown here.
Work continued to progress well and I completed the Tile Boarding of the Bath surround , but out the front in the loft for safe keeping and to allow full access for the plastering. I will seal this once the plastering is complete.

Weekending 8th September 2019
Plastering Prep Tasks
So, this week is preparing for the plastering next week and I am doing the final small boarding bits and plan to do my wall rendering before the end of this week. I have used expanded foam to fill some of the holes and this is both easy to apply and cut afterwards. I also used soem to fix one of the steps of the stairs and produced a very good result. I have ordered the Oak Cil for the Garden Room for a local wood yard and should get a call to collect this week.

 I have start to fix the Salon Chimney Mantel, which is a tricky task but progress was made as shown here and I will hopefully achieve the desired result.
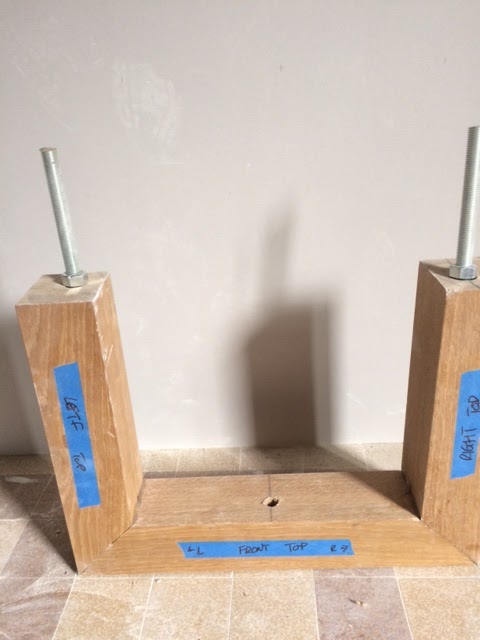
I have assembled, pegged and glued the Mantel to test the fit of the unit before finalising matters and found that it is about 1-2mm too small and tight to go around the chimney. However, after a small reduction in the left and right hand side, it should be fine and I think I have a way to plane the side down a little and plan to attempt this next week whilst the walls are being plastered.

 Had a good morning applying the first render coat to the Chimney and Garden Room Alcove, before plastering starts and again the Enduit 65 Mix was great to work with, providing you get the water/powder ratio right.
Will start the work to Point the rear Garden Room stone wall tomorrow, but might need to get a pointing trowel before I commence.
Weekending 15th September 2019
Plastering
As hoped R.Kenwood Plastering arrived early on Monday and I was immediately impressed with their organised unload from the van into the house. Everything was prepared and a place for everything. Russell and Stevie have clearly worked together loads and it was an organised and professional machine jumping into action. The upstairs ceilings and walls had scrim and beading applied and readied for the plaster.
Tuesday and Wednesday were spent applying both the first and second coat and then preparing the downstairs in the same organised way. There were some issues with coats drying quickly, buy the end result was SILKY SMOOTH, and my french electricians and plumbers visited and kept touching the finished wall in disbelieving way; they were impressed to say the least.
I am simply delighted and excited at seeing the full complete result at the end of the week, but already it is obvious this is a high quality team who create an exceptional quality end results.
Here are some snaps of finished walls partly dried.


Well, its Friday and the final work day this summers visit. Temperature has reached well over 30 outside, but it is thankfully cooler inside the Maison, so final plastering of the Utility and Cuisine can proceed and it is looking great. I will publish photos when tomorrow when the rooms have had a chance to dry out. What I can say is how impressed I am at the fantastic finish quality. I am so pleased I discovered Russell, as I could never have achieved a good result just dry lining the plasterboard joins and edges. The use of real professionals like Russ and Stevie is totally justified and it is so good to find skilled, reliable guys who take such pride in the work and end result.
I am a truly satisfied chap today and will return to the UK on Sunday looking forward to my return in October to give the whole inside a few watery white emulsion sprays, before Linda decides the colour scheme for each room.
Here is a video of the final fully plastered rooms, drying out: