This is the story of the Gray Family search for a home in France and the eventual conversion of a Barn in the Creuse that has now been turned into a beautiful home for our family to enjoy in the years ahead.
The story of La Grange Grise gives an indication of our experience of doing so between 2006 and 2016.
Also added are details and history of the subsequent purchase and work on La Maison Grise from 2013 and the renovation work started in 2016 on the house opposite our the Grange.
I arrived at end October before the France Covid Lockdown came into effect and had fortunately preorder with Gedimat to deliver materials needed during w/c 2nd November. They delivered without an issue on Monday 2nd and this allowed me to commence work without delay.
I had prepared the following Work Tasks to convert the Loft into a usable space:
·Remove
Old Floor Insulation
·Clean
Floor
·Wood
Treatment on Floor and Roof
·Create
Loft Floor Door Frame
·Build
Loft Door and Insulate
·Run
Electric Cables for Wall Sockets
·Run
Electric Cables for Roof Downlighters
·Line
Perimeter Back + Front Walls 14x0.6m Insulated PB
·Line
Side East * West Apex Walls Insulated PB 21sqm
·Plasterboard
Stairs Wall West Side
·NorthEast
Corner Store Rooms Stud Frame
·Plasterboard
+ Insulate NE Corner Store Room
·Fix
2xDoors & Frames 800x2000
·Insulate
Roof 21sqm
·Plasterboard
Roof 21sqm
·Render
both Chimney Breasts
·Floor
Sanding and Staining
·Spray
Paint Plasterboard
·Install
Light Switches
·Install
Downlights
·Install
Power Sockets
·Fit
Skirting Board
WeekEnding 8th November
Here are some snaps of the work progress during the week:
I had already ordered the doors and frames from Lapeyre and as before created the partition framing around the three doors that will allow the loft to be accessed from tbe stairs and create a Store Room, as well and as a Utilities Room for the electric fuse panel, bathroom water heater and Sun Tunnel.
The doors are square and opened without adjustment, so once the ceiling is completed the framing to plasterboard will be added.
I had a lot of Tyvek House Wrap left from previous work and to avoid the insulation touching the roof tiles and to create a 25-30mm air flow space and vapour barrier, I used the wrap across the vertical roof beams
Weekending 15th November 2020
Having completed the fixing of the Tyvek, spent the week securing the SuperFoil40 insulation across the sloping roof and securing with horizontal Chevrons to the main vertical beams and then additional vertical Chevrons that would provide the support for plasterboard and additional vapor gaps.
The SuperFoil has 37 layers of foil and insulation to protect against the cold and heat. it was easy to install, but needed sharp scissors and a knife to cut and then sealed with foil tape and stapled on the edge to keep in place until the chevrons are applied.
Weekending 22nd November 2020
Having completed the fixing of the Tyvek, spent the week securing the SuperFoil40 insulation across the sloping roof and securing with horizontal Chevrons to the main vertical beams and then additional vertical Chevrons that would provide the support for plasterboard and additional vapor gap.
I also create a structure for a central ceiling for downlighters than would allow the A-Frame Structure to be exposed and for extra ceiling insulation supported. Additionally, I cut 10 Insulation boards in half and 30 plasterboards to be able to lift them up into Bedroom 3 in advance of finally lifting them into the loft!
In advance of plasterboarding, I installed the sheathed electric cable runs for lighting, radiators and sockets. Despite initially forgetting, I installed the light switch cables eventually as well!
Weekending 29th November and 6th December
Having completed the insulation and support structure the next two weeks involved securing Insulation Board to the stone walls on both chimney said Apex Walls and the low front and back walls. Then securing plasterboard to the both front and back roofs and the flat ceiling.
Another hot morning on Tuesday so I started the work early and finished by mid day with the render to the inside wall of the Utility Room. The experience yesterday made the task a lot easier and I managed to create a smooth finish, before apply the stipple effect with the brush to texture the wall and hide the imperfection!
Work Completed - 1st to 18th June 2020
Having arrived here at the end of May, I commenced work on La Maison as planned and covered on the Task List. After 3 weeks all the planned work on the Task List below is completed up to Connecting the Water and Basins, Shower and Bath, as well as Sanding the Floor Boards.
The Wood Burning Stoves are in and the Balsalt Stone Hearths arrived and are in position. Really pleased with these and they set off the stoves on the flooring.
Had a small problems with the Bath water waste not escaping and had to get access to fix the pipes. I messed up before by using a long piece of flexible pipe, but had sorted it all now.
Here is a short video of the work completed to 18th June 2020
On Monday and Tuesday, I did some little tidy up jobs and took the opportunity to load the trailer with the old loft insulation and take it down to the recycling center and total cleared the loft, as well as order three door for the upper stair, the new store and electrics, boiler room from Lapeyre. These come complete and assembled with the doors, so making it easy to construct the framework around, rather than making them fit the frame. Should be collected on 10th July.
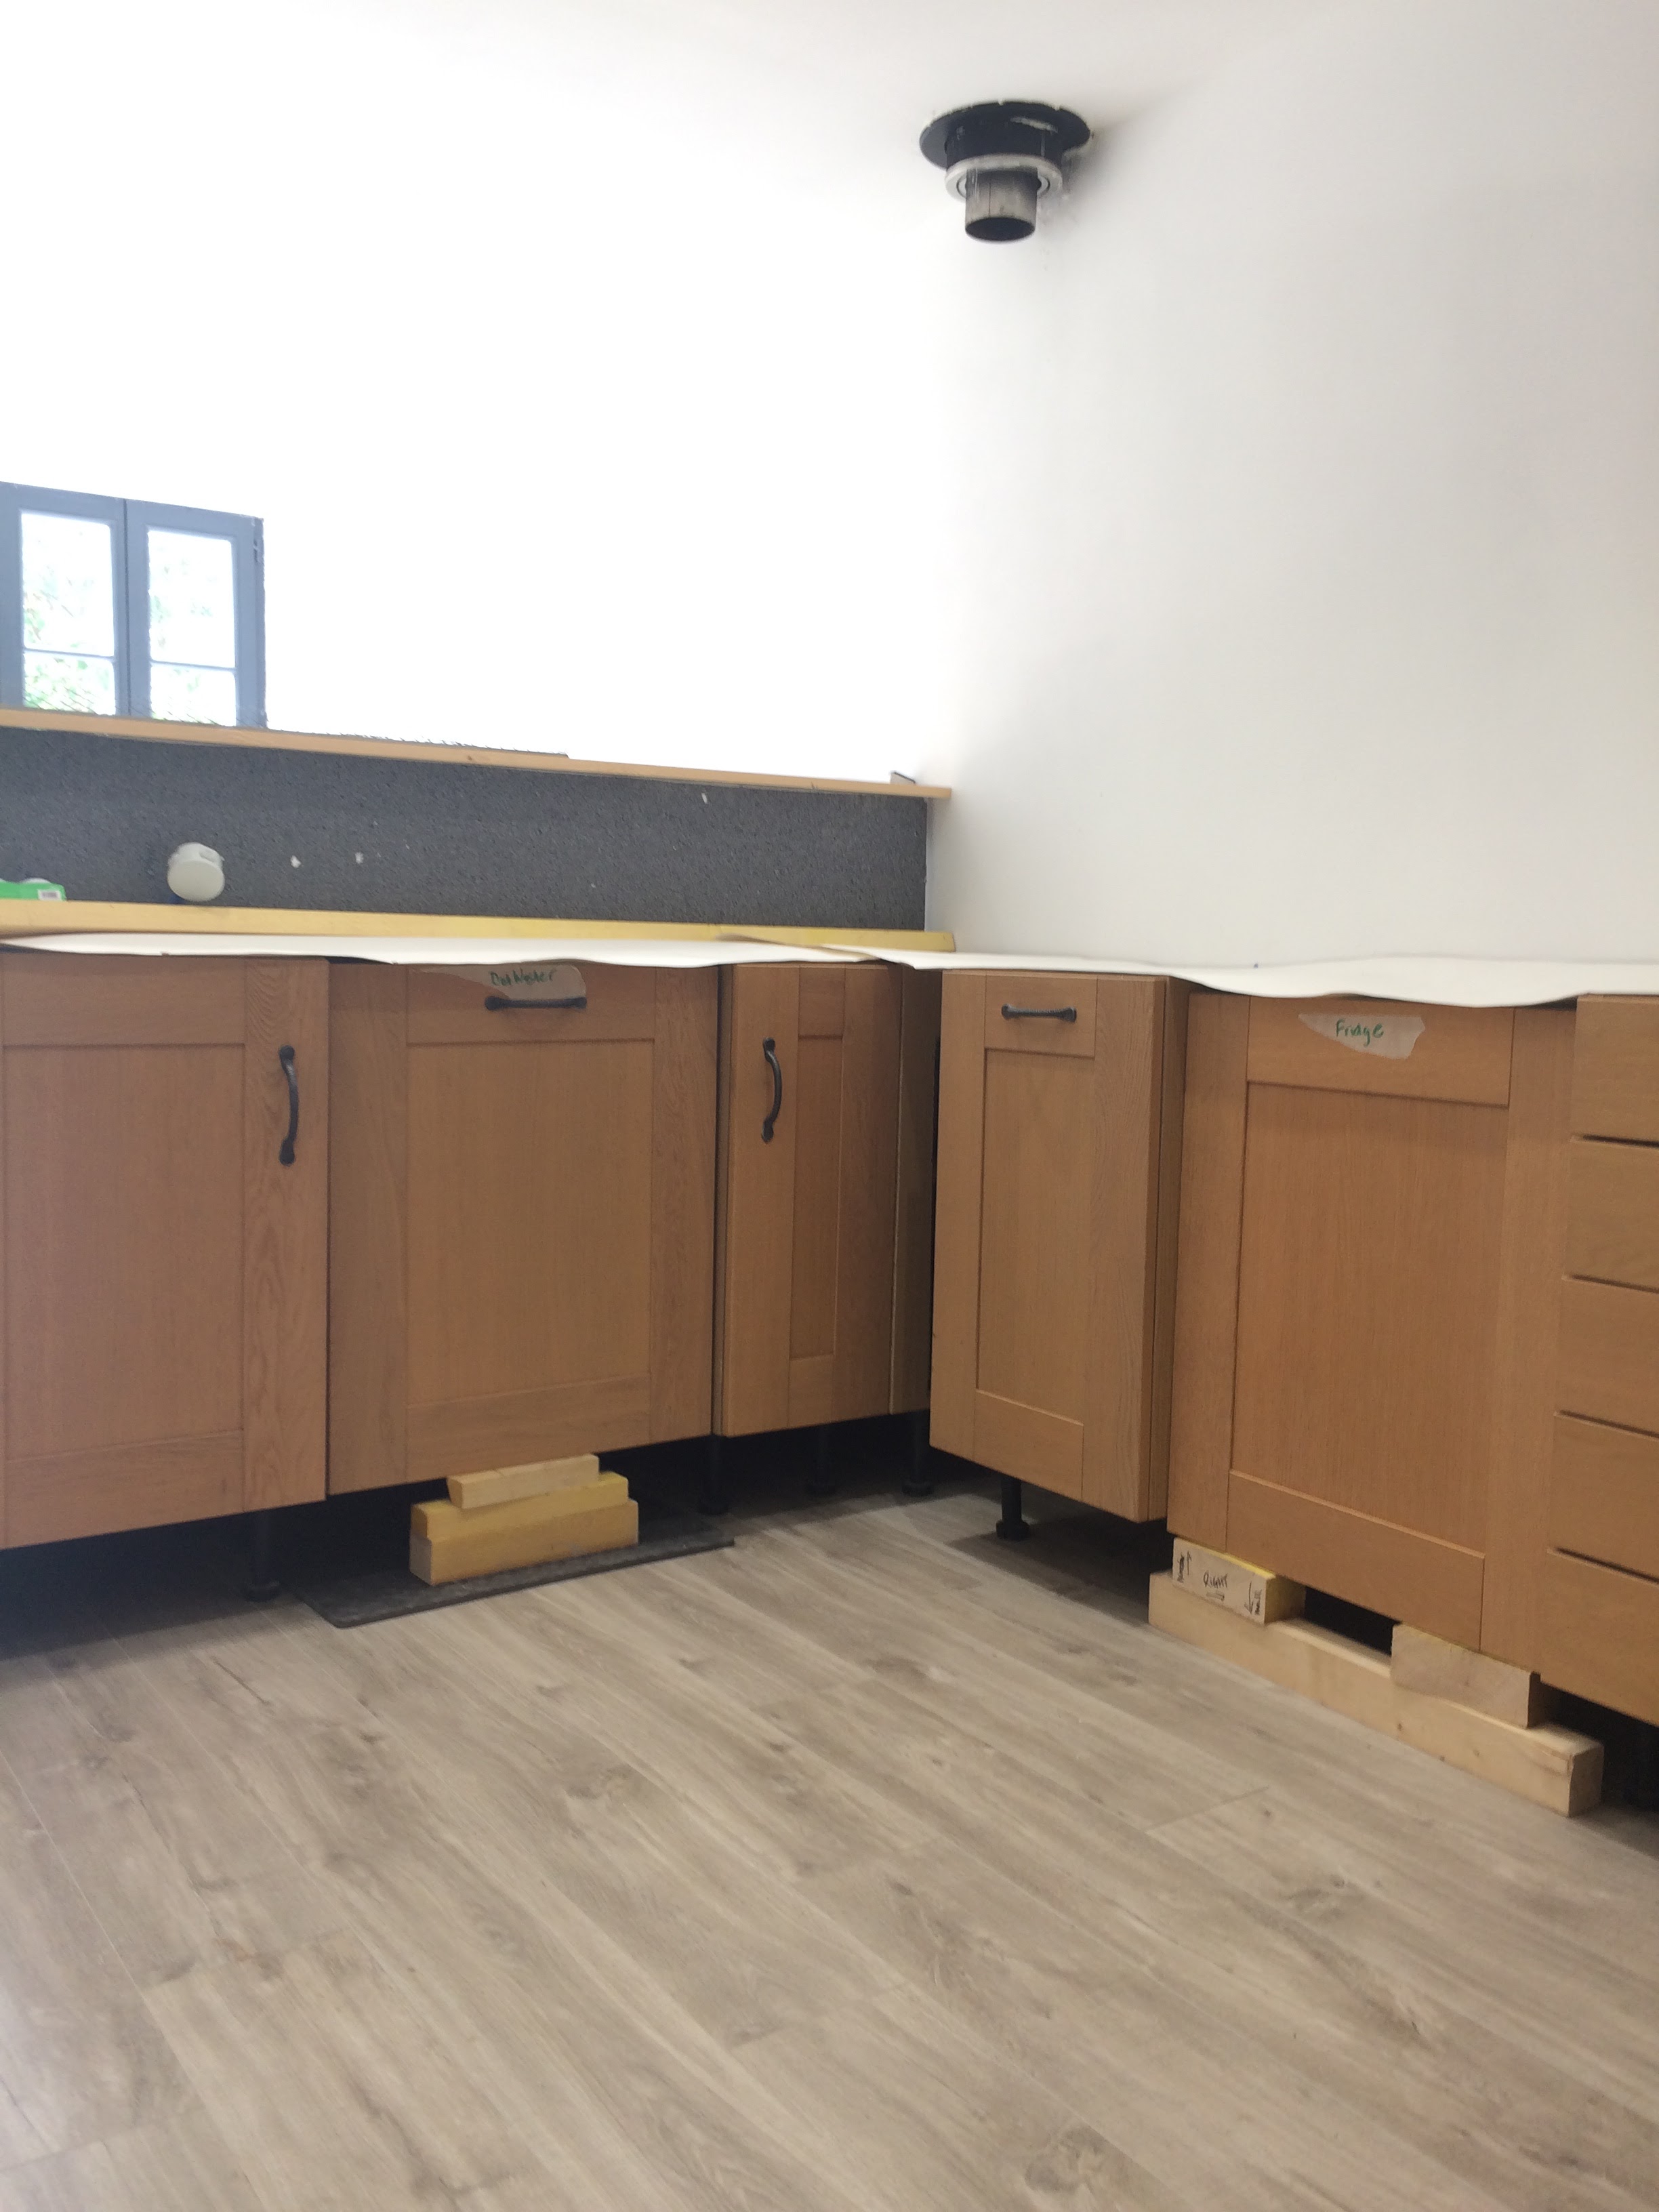
Despite the heat wave starting I decided to moved the Kitchen Unit carcasses into the house. These have been stored in the barn since 2014, but have survived without issue and I managed to move and loosely position in the morning before the heat became too much.
Here are some pics of them in position:
I
I have realized that the Corian Worktops I bought with me will not fit or any too much and risky work to undertake so have ordered units for Leroy Merlin, with a new compound sink, dishwasher and a corner Extractor Unit.
I should have enough of the same Oak Doors to construct units for the Utility Room, so they will all match, hopefully....!
After discussion, we have decided to remove the tall fridge cupboard enclosure on the left side wall to keep it clean and have a under counter fridge and a large freezer in the utility room. This has improved the look, flow and will make things easier. I have also temporary erected the partitions to create the look. the counter top partition will be 20cm above the final worktop, which I have ordered, but is 30cm at the moment and. will be cut to size when and I get the worktop installed.
So tomorrow, I will be able to fit the damage feet to some units and then adjust all to level and ensure room for the bottom Kick Board I am also expecting delivery of the additional tin of Manns Pine Stains - Driftwood to finish the upstairs floor and then next week finish these floors with the OSMO Polyx Oil to protect the floors.
Friday 26th June 2020
It is funny how things have a way of solving themselves when you have time and least expect it!
Having removed the large fridge cupboard I needed to move it out of the way and into the Utility Room and this was the first task this morning and went easier that expect, as I was fresh, but I now need to move forward a low level socket.
The wood filler on the damaged feet base had dried enough to secure the feet bases to three units and I was able to get them done and in position, but will wait until next week to fit the feet secure. In doing so I realized 45cm Waste Bin Cupboard would be better by the sink and swapped over a 30cm cupboard to the hob/oven area.
Having misplaced large chimney cover, Barry from Stove Sellers delivered a replacement and this allowed me to adjust it to fit into position and next week I will secure it fully to complete the Wood Stove installation.
Additionally, I was delighted that DPD delivered the extra Manns Pine Stain I ordered and this allowed me to complete the upstairs floors, again making them ready for the Polyx Oil treatment next week as hoped. Success!
Weekending 5th July 2020
Monday and Tuesday
So, the week started well and having adjusted the feet of all the units to allow the Kickboards underneath, I secured the new Kitchen-Utility Room partition wall against the end Larder with Expanded Foam and it has proved really good and strong.
The chimney cover has been applied and now just needs a little plaster filler to tidy up, but the most satisfying task on Tuesday is that I managed to clean and install all the cupboard drawers and doors, making the kitchen take shape. Just need to work out how the Larder Pull Out cage gets properly installed. Easier said than done!
Wednesday
In preparation for work next week, early this morning I went to collect 10 bags of the VPI Enduni 65 single coat render for the old rear house exposed stone wall. This is now the Garden Room Wall that I expose and will coat and brush off the render to fill the gaps and leave the stone exposed, but more of that next week.
So, today I also replace the single wall socket that was left expose when we decided not to use the Tall Refrigerator Cupboard on the side wall. It looked silly to have the wall and worktop space without at least tow appliance sockets and the single, as well as another double socket will be used on partition backed worktop, once the dishwasher is installed, the low partition secured and lowered.
I also got some french partition corner strips, which are excellent and rigid, as well as code coded and applied this to the partition by the door to the Utility and will plaster fill tomorrow
The rough plan for the rear wall of the Utility Room was adjusted today, which I decided to utilse the last full cupboard and three drawer and thought it look better on the end and visible from the Cuisine as shown below.
So, I have finished the week successfully with apply the first coat of plaster to the partition corner on the units to the door and pleased with the result, just need a little clean up and a final fine coat. Satisfyingly, I succeeded in working out what bits were needed and how to install the Larder mechanism and wire baskets, as well as the door.
I also decided to raise the height of the Utility Room cabinets, so that the work-surface ran above the ledge on the east side wall and moved the water feed tap to the east side where I have decided it will be better to locate the washing machine.
After days of try to work out how the small cupboard wire trays would work it came to me late Friday evening and first thing on Saturday confirmed how to changed the support bracket so the door opened to the right and I succeeded in mounting the mechanism and trays correctly...very satisfying!
So, now I have finished the units in the Cuisine until the appliances and worktop arrives. Next week, I will make a new cupboard unit in the Utility to support the sink, once the washing machine arrives that will fit next to it and will start to render the rear Garden Room Wall, if all goes well.
Weekending 12th July 2020
Have made a good start to the week Fitted an outside light above the front door, with some minor changes needed and start the rendering of the Garden Room Wall, as planned. Have completed two 1.5m sections at either and or the wall and with the advice of a neighbor left the first coat to dry for nearly two hours and then brushed off and buffed the main stones with a wire brush. Good advice and I am pleased with the final result. With luck should finish the rest of this wall tomorrow and then just need some touching up down later in the week.
Today was a good day that resulted in the wall being completed, with just a little touch up work once all is dry later this week. Very satisfying and the render is great to work with.
Visited Limoges on Thursday to collect the 3 doors and frames for the Loft from Lapeyre and the Sink Taps from Leroy Merlin. By the time I returned it was just under 30 degrees so time for only easy work. The wall has dried out nearly and the colour softened nicely. Having cut most of the panels for the Utility under Sink Cupboard yesterday, I assembled and fitted the feet and door today as shown. very pleased with the result and just need to add a filler panel, before the Washing Machine is delivered tomorrow and then finalise the space and fittings before the worktop is collected in August.
So finished the week with a productive day and got the Utility under Sink Cupboard finished, with the blanking side and shelf installed, and adjusted the door. The extra Polyx Oil arrived in the morning and I was able to finished the Bedroom 3 floor before the delivery arrived of the DishWasher and Washing Machine. Unpacked both and placed them into position to verify the space requirements and will complete things next week.
Sunday 12th July 2020
Yet again, the benefit of time and reflection has [roved beneficial and resulted in me deciding to swap the Dishwasher and Fridge locations. I realised the water feed to the DW was going to be difficult and would be easier and accessible if I located the DW where the Fridge was planned If fact it might prove a better preparation work area for the fridge to be under the partition wall and more natural for the DW to be between the sink and hob. So next week I will prepare the wall feed and electric points for the new plan, in advance of the worktop collection early August.
Weekending 19th July 2020
As has often been the case, the smaller tasks can take longer and this week has eventually seen the fixation of the cabinet units, securing the low partition wall and installing electrics to the partition wall. I have added a second side of plasterboard to the insulated board and this has give added strength and installed a double and single socket in the back. I used Expanded Foam to glue the two sections together, after cutting cable channels in and then used the foam and a few brackets to secure the board to the back of the units.
Today, I have connected the electrics supply and added a small double socket to the inside rear void of the waste bin unit, which is perfect as it gives access to the sockets for the Fridge and Lighting for the kickboard that I will install.
Working week has come to an end and a few small but time consuming tasks underway I gave the kitchen partition a fine plaster coat on the main corner and top. The top and and end will be finished with Oak and I will need to rub down on Monday and give hopefully a final coat. Whilst I had the plaster I gave the Bath End Panel by the radiator a fine coat as well
I found a piece of panel to be able to cut and make a kickboard for the Utility Room Cupboards and did some plumbing prep, ahead of getting the worktop and final fit of the sink.
Weekending 26th July 2020
The hot weather continues and despite this I proceeded to mix and apply Enduit65 render to the Garden Room side wall. It again went on easily and after waiting for it to partially set I was able to Stipple the wall to give a texture and flatten the look. There is some added fixing needed, once all has dried but tomorrow I should complete the internal side wall in the Utility Room.
I also cleaned the Garden Room floor in prep for the final grouting being applied tomorrow.
Weekending 30th August 2020
Work continued during August, but As I was doing a large detailed update I lost the page! This result is my tiredness stopping my updates, but good progress has continued and he is a video of the status of work:
So now once I have fitted the additional worktop in the Utility Room and got the Plumbing connected to the Utility sink, it is just painting of all the Skirting Board and Architrave to do next week and then lots of fine finishing to complete the work. Oh! and get the door handles and locks sorted, as I need to use french ones and not the cheap UK sourced items.
Weekending 27th September 2020
The great weather continued during September and we only had a little little rain in the final few days of the month. The final video of work this summer shows that all the key tasks have been completed and now just fine finishing is needs during my next winter visit.
Looking forward to returning and hopefully completing the work on La Maison Grise this summer. The following is the Task List planned for completion and hightlighted are key major tasks:·Secure Toilet Bowl
·Tile Shower Top ·Grout Bath ·Seal Bath &
Shower Edges ·Fix Wood Stove
Hearths ·Seal Skirting –
Downstairs ·Seal Vinyl Edges ·Table Top Oak ·Fit Ceiling Roses ·Get Floor Sander –
Leroy Merlin ·Sand Landing, Bed1
& Bed 3 Floors ·Get Tap PER Connectors ·Fix PER Connectors in
Loo & Bath Basins ·Move Kitchen Units to
House ·Kitchen Loose Layout ·Fix Kitchen Units ·Construct Back Frame
& Plasterboard ·Utility Units Layout ·Get Render 65 – Tout
Faire ·Render GR Back Wall ·Finishing Grout GR
& Utility Floors ·Fit Door Handles
Despite having done a full write up over the last 2 weeks of all the work completed, I pressed the wrong button late last week and deleted the post, not being able to recover all the work and photos posts!
So, will do so once I have the energy to do so again, but is the meantime I have recorded a short video of the flooring work completed that shows how things have change and completion is now insight.
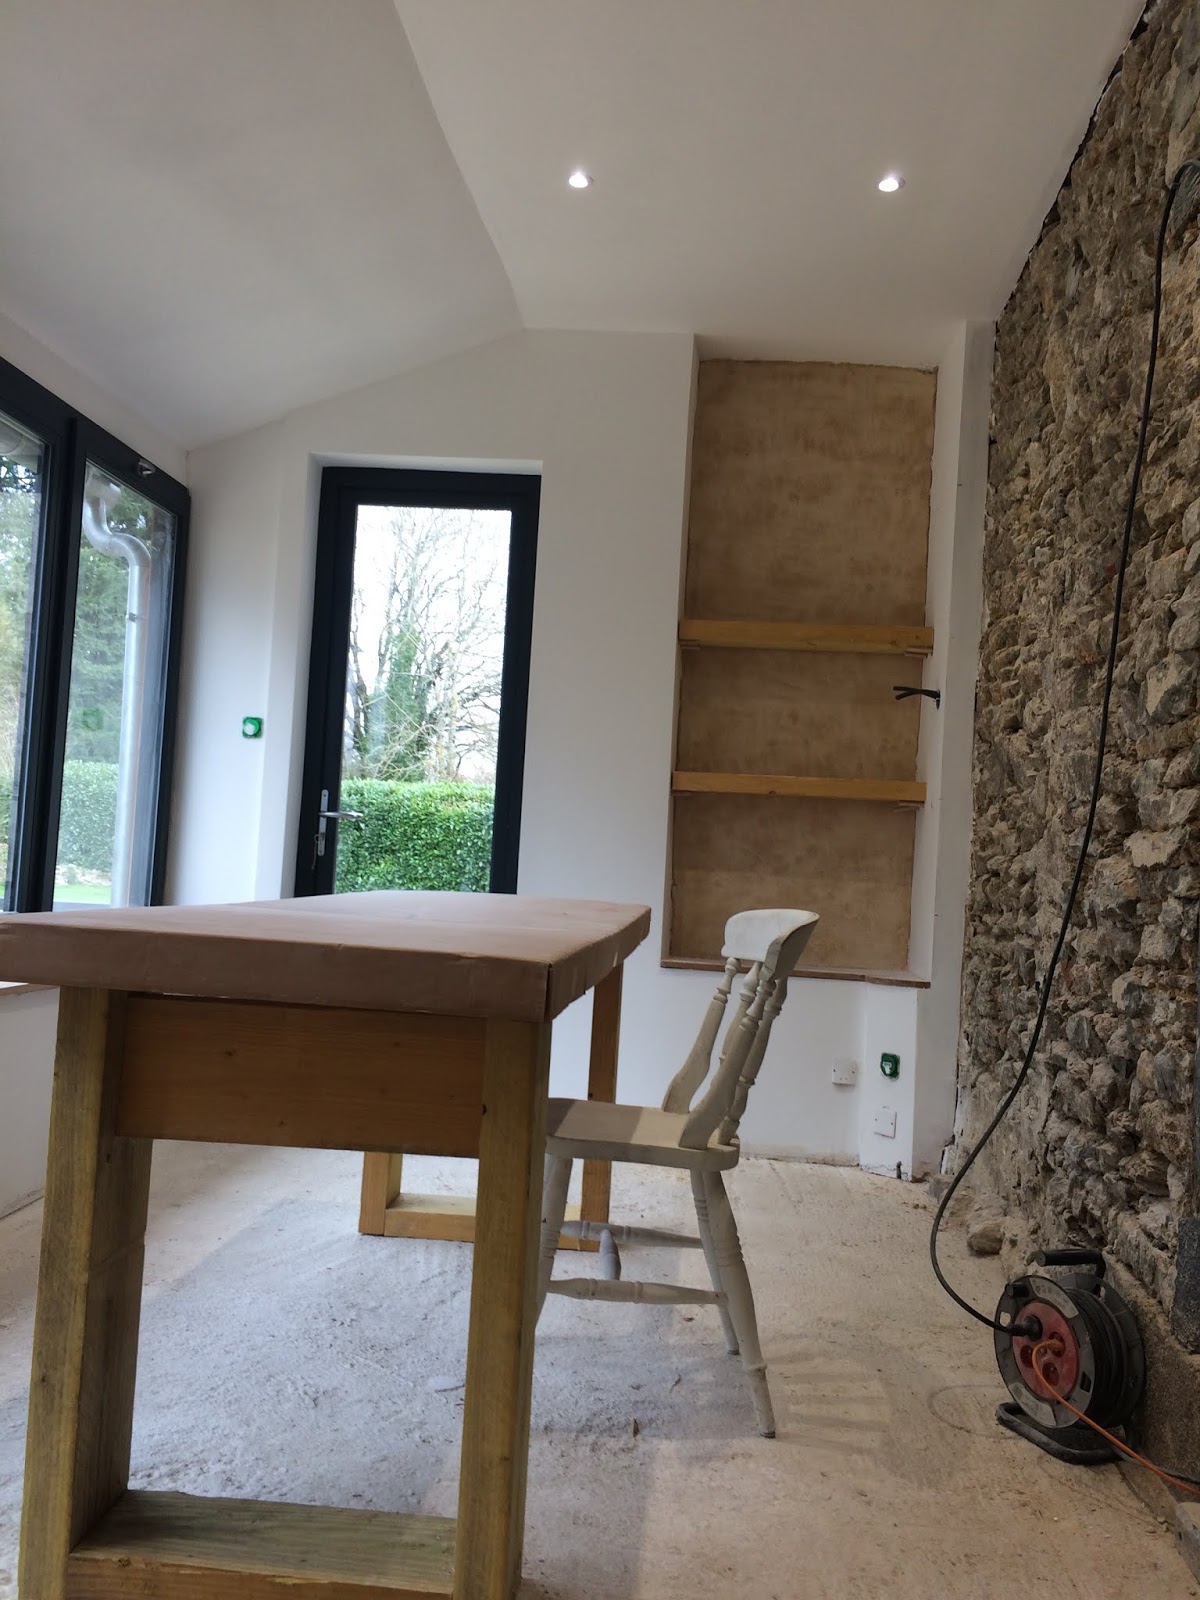
Week commencing 13th January The work plan has been disrupted a little this visit as it is so cold and below 5 degrees so I have to be careful what is done when Alcove Shelving- As planned I cut down one of the roof joists I had left to create some shelves in the Alcove in the Garden Room, as shown here. I have another to place above and then need to plane them down and paint to create the final finish, as well as cut some slots underneath to support each with the dowels I have placed in the side walls. Dining Leisure Table - Again using the spare roof joists I have create legs and a frame for a table to be placed in the Garden Room. It is 2m x 78cm and I have ordered some oak panels to form the table top. So once planed and the legs painted it should look good and sits in the room perfectly to easily seat 6, if not 8 places, as shown below:
Downstairs Floor Leveling - I have been struggling with getting a plan for the level of the Garden Room floor to ensure the tiling matches the height of the Utility Room, so eventually took the plunge, having done a lot more research. I treated the floors with the Weber Sealant and measured things again. I decided an average covering of 5mm of self leveling compound was needed in three main areas of the Garden Room. I actually ended up applying a thinner second coat, after another sealant coat. It has ended up satisfactory and before I leave this time I will apply a top coat of sealant to the Garden Room.
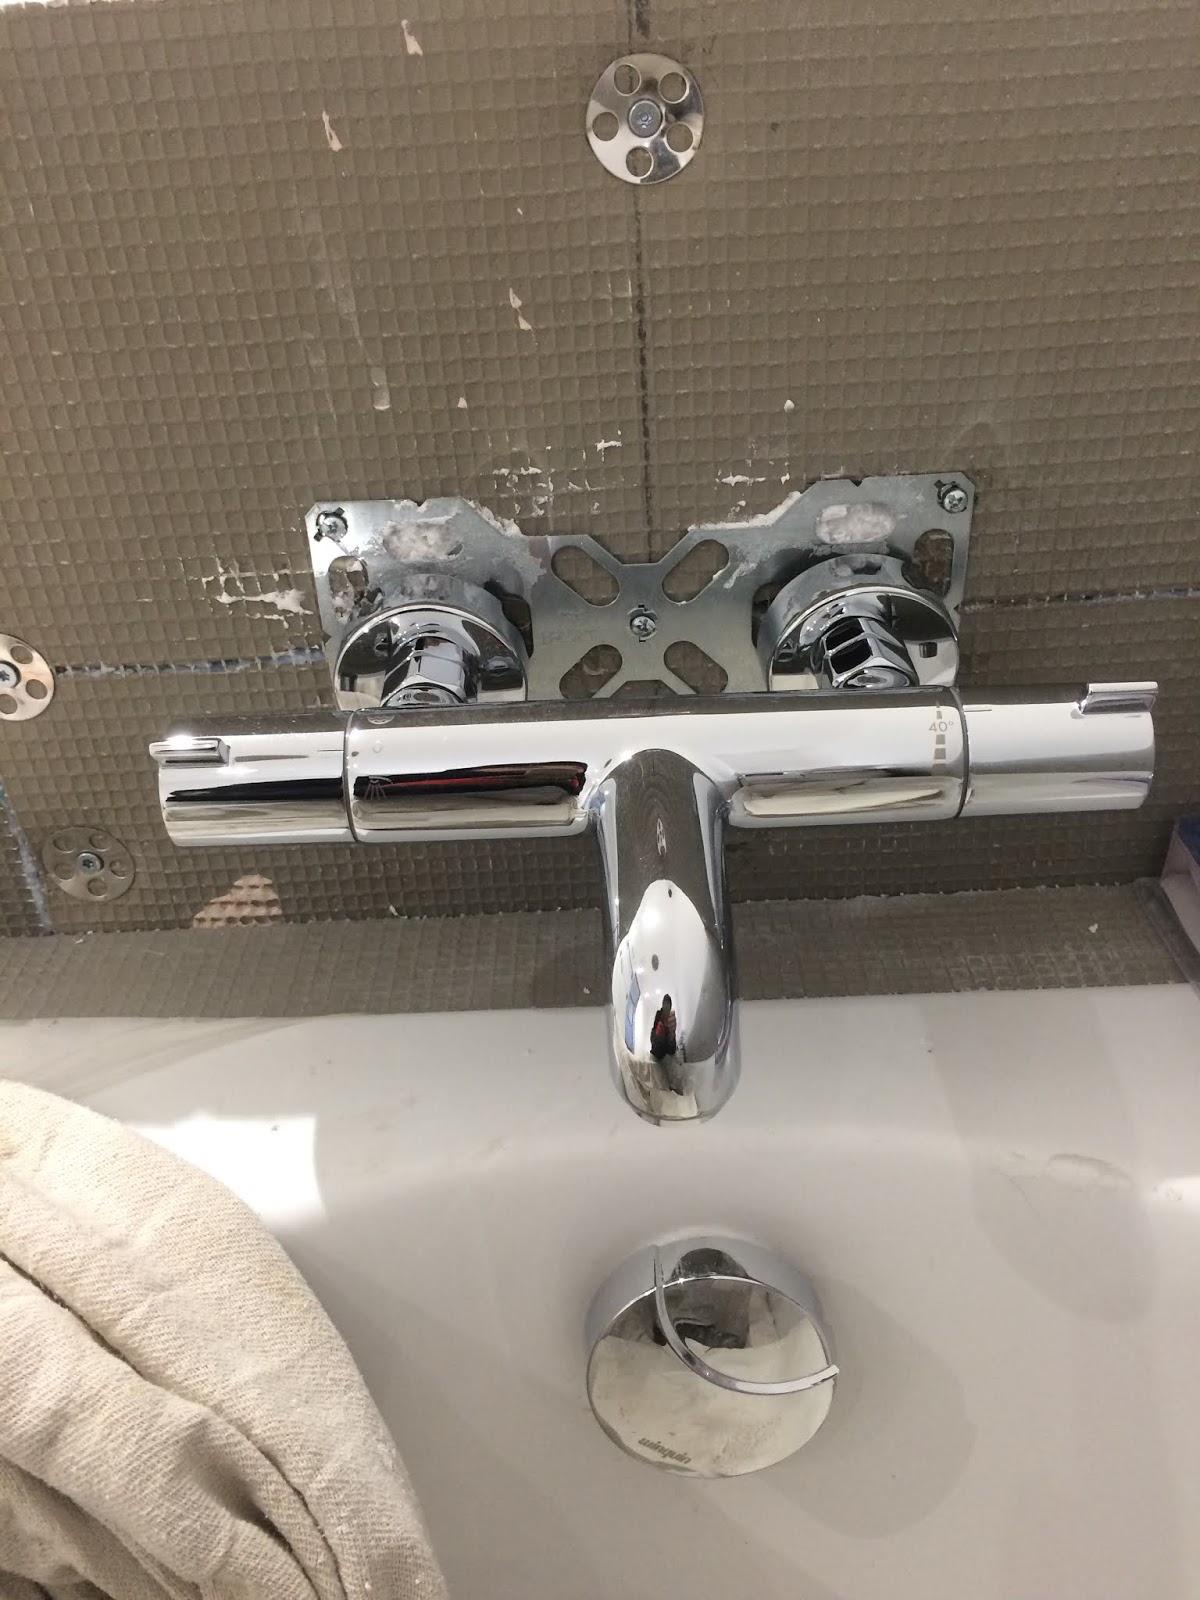
Water Feed Connections- Before the tiling can commence I needed to complete the Water Feed Connection and to be honest I had been delaying this as it required to make PER Fittings to the plastic pipes the guys had run. Again I took the plunge and realised I had over engineered the wooden support at the back, so had a bit of work to do to remove that through the feed holes. Although it took a lot longer than expect it ended up good and I made good and sealed around the all the shower and bath water feeds and test connected the taps. Very pleased in the end.
Floor Sealant Tape Whilst in the UK and researching I found some shower tray sealant that is attached to the walls and 'lips' over the tray, so then applied this to create a full water seal on both the shower tray and bath edge under the taps. So with luck no nasty leaks!
Shower Door I also fitted the Shower Door, so I could seal everything and fully tile up to the door. Despite choosing a low cost 180 euro Leroy Merlin door it proved great. Easy to install and adjust to the width and works really well, with great edge seals. It is a swivel door 680mm wide and sits on the shower tray really well.
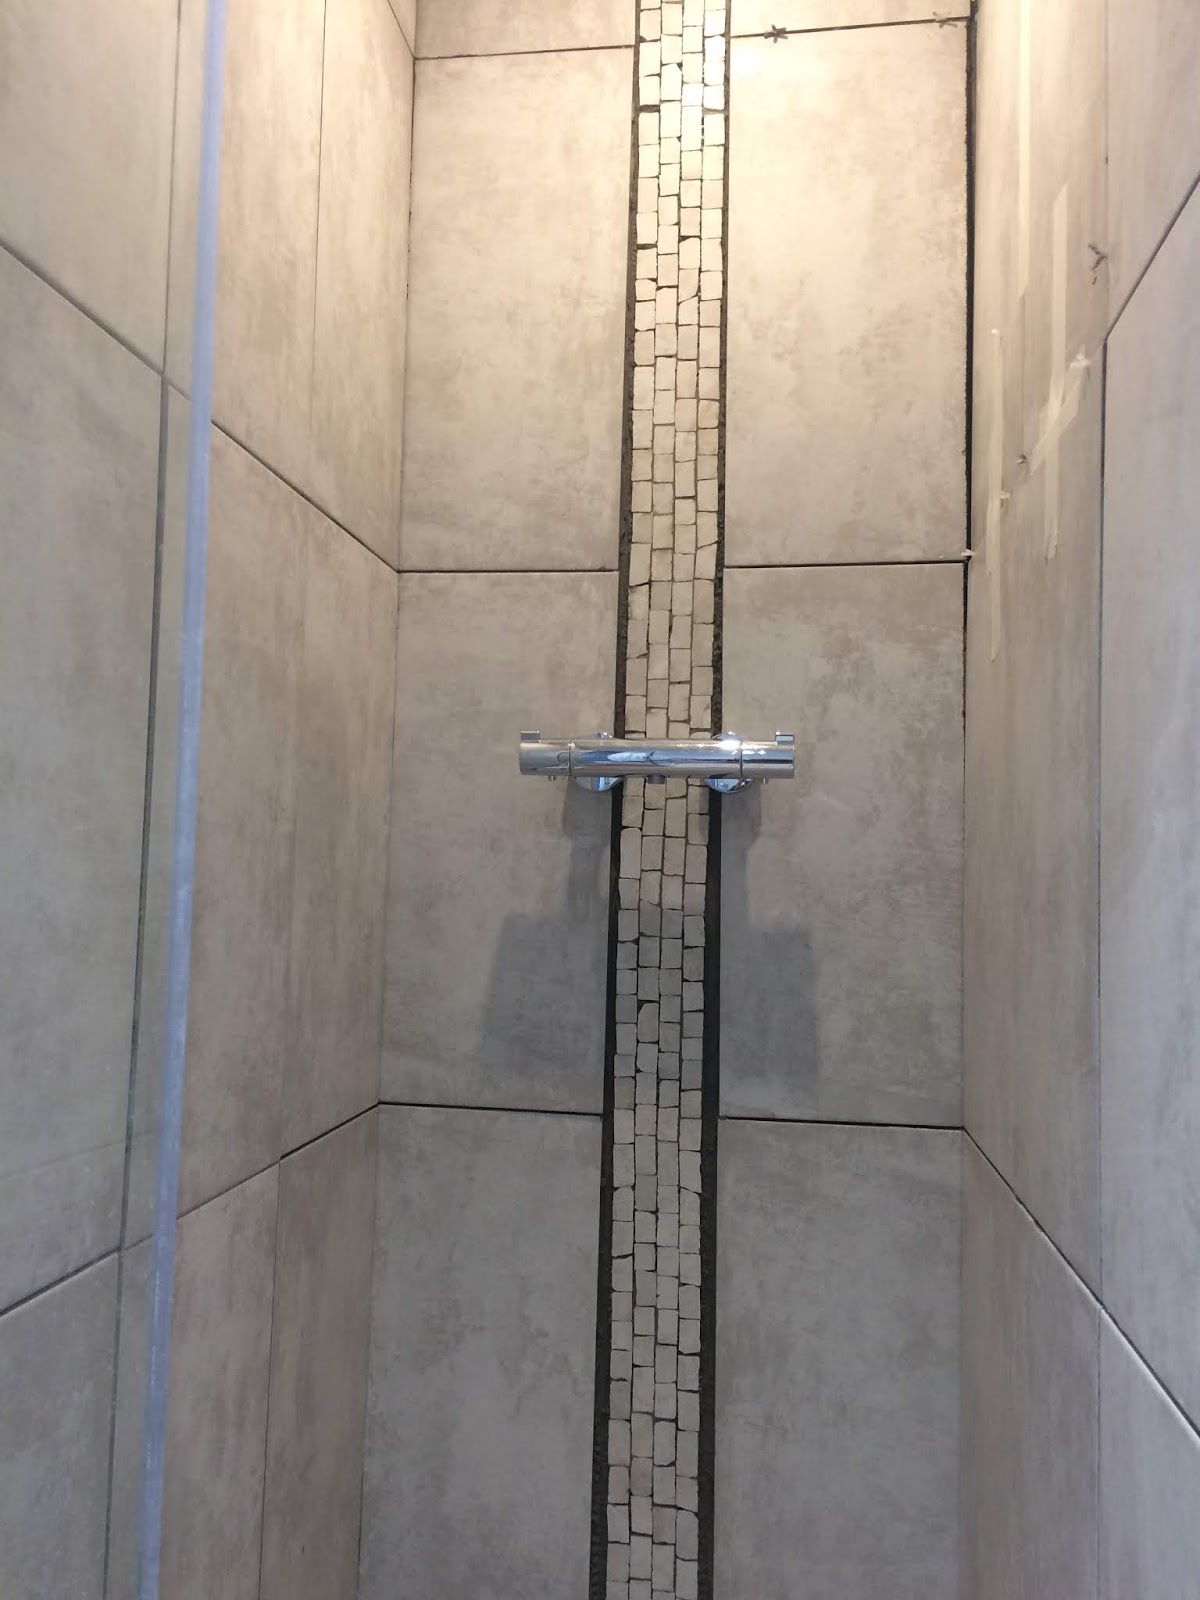
Electrical Inspection Had an inspector from ConsuelPRO visit, to inspect the new Electrics, which is essential to get a Certificate of Conformity and only then will EDF activate the new account and switch on the supply. It was very impressive and professional. He found a few faults that Frederic of ALS_Frappat needs to fix, but I replace the radiator connector covers with water proofs ones. These are seriously good and well engineered. Bathroom Wall Tiles- So now, I can start cutting all the tiles.... and on Friday 24th I managed to tile most of the shower and all the bath area. Just a few tiles to cut around the inset shelf in the shower and a few smaller edge tiles to cut, as well as the Mosaics to apply. It was hard work yesterday and made more difficult by not be able to find a manual tile cutter or file over here. Will hopefully finish all today a take a few snaps.
Well two full and hard days of tiling has resulted in a good outcome that I am pleased with and I just need to grout now when I return in March. A few mistakes and miscalculations, but should end up with a good result.


 I
I 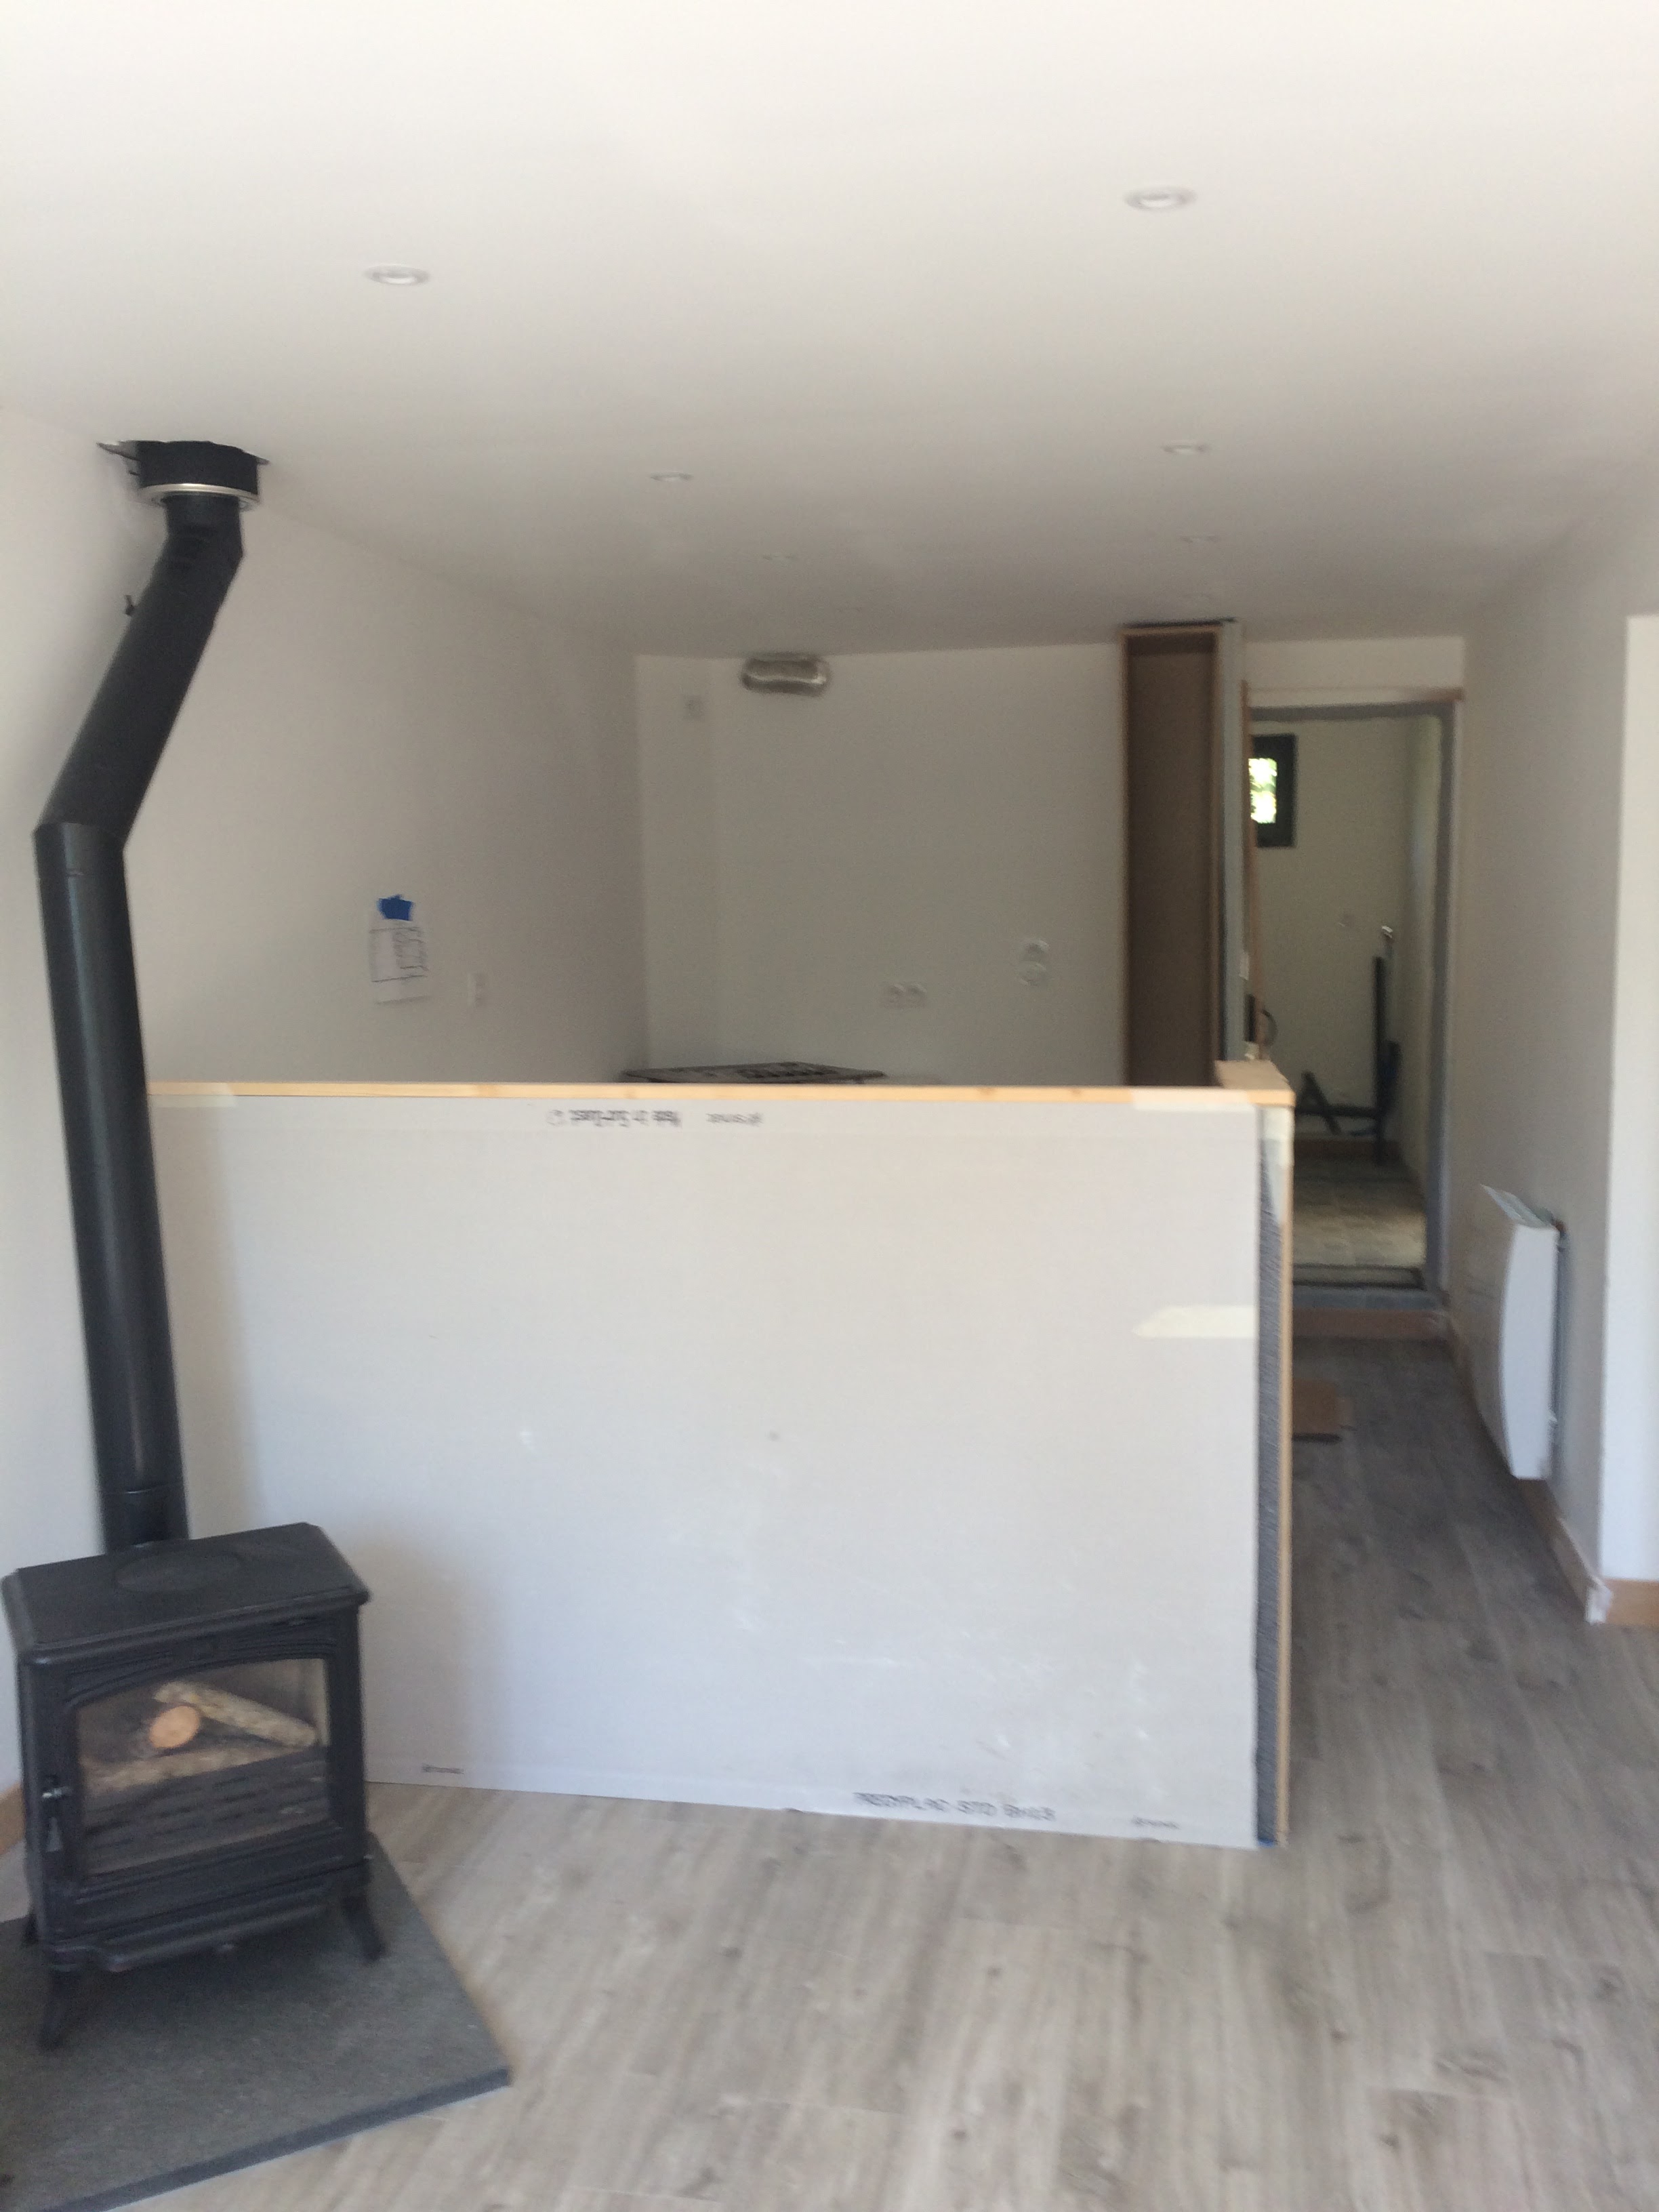


